[HAI5016] Get your systems ready
Before we can start working on our projects this semester, we need to make sure that our systems are ready. This guide will help you set up your system with the necessary tools and software.
Disclaimer: This blog provides instructions and resources for the workshop part of my lectures. It is not a replacement for attending class; it may not include some critical steps and the foundational background of the techniques and methodologies used. The information may become outdated over time as I do not update the instructions after class.
Hands-on: The terminal (CLI)
I assume that most of us are familiar with graphical user interfaces (GUIs), where we interact with our computers using windows, icons, and menus. However, more structured tasks, such as development tasks are often more efficiently performed using the terminal.
The terminal (or command line interface, CLI) is a powerful tool that allows you to interact with your computer using text commands. It may seem intimidating at first, but it’s an essential skill for any developer or AI Engineer.
To get a bit familiar with the terminal, we will use it today to install the necessary tools for this course. Before we dig into the installation steps, let’s take a look at some basic terminal commands:
| Command | Description | Example | |
|---|---|---|---|
pwd |
Print working directory - shows the current directory you are in | pwd |
|
ls (or dir) |
List files and directories in the current directory |
ls or ls -la (to show hidden files) |
|
cd |
Change directory - navigate to a different directory |
cd Documents (to go to the Documents folder) |
|
mkdir |
Make directory - create a new directory | mkdir my-folder |
|
rm |
Remove - delete files or directories |
rm my-file.txt or rm -r my-folder (to delete a folder and its contents) |
|
echo |
Print text to the terminal | echo "Hello, World!" |
|
code . |
Open the current directory in Visual Studio Code | code . |
|
> |
Redirect output to a file |
echo "Hello, World!" > hello.txt (creates a file with the text) |
Some more useful info for using the terminal:
- You can usually copy and paste commands into the terminal using
Ctrl + CandCtrl + V(orCmd + CandCmd + Von macOS) - You can use the
Tabkey to auto-complete commands and file names - You can use the
UpandDownarrow keys to navigate through your command history - You can use
~to represent your home directory (e.g.,cd ~to go to your home directory) - When Visual Studio Code is installed, you can use the command
code .to open the current directory in Visual Studio Code
Let’s get hands-on with the terminal!
Navigate your file system
-
Navigate to your home directory by running
1

cd ~
And check our current directory with
1

pwd
This should show you the path to your home directory (e.g.,
/Users/your-usernameon macOS orC:\Users\your-usernameon Windows). -
Let’s see what is in your home directory by running
1

ls
This should show you a list of files and folders in your home directory. You can also use
ls -lato see hidden files. -
Type
cd Doand press theTabkey. This should:- Auto-complete to
cd Documents(if only one match exists), or - Show a list of folders starting with “Do” (if multiple matches exist).
1
2

$ cd Do
Documents/  Downloads/
- Press
Tab, thenEnterto navigate to the Documents folder. - Explore your Documents folder with
ls.
In Linux and macOS the file system is case-sensitive, so
Documentsanddocumentswould be considered different folders. In Windows, the file system is case-insensitive, soDocumentsanddocumentswould refer to the same folder. - Auto-complete to
-
Go up one level to the home directory:
1

cd ..
This should take you back to your home directory. You can verify this by running
1

pwd
which should show you the path to your home directory.
-
Let’s create a Development folder in your home directory by running
1

mkdir Development
This will create a new folder called “Development” in your home directory. You can verify this by running
lsagain. Then navigate to the Development folder by running1
cd DevelopmentYou can verify that you are in the Development folder by running
pwdagain, which should show you the path to the Development folder. -
Let’s open this folder in your file explorer so we can get visual overview of what we are going to do next.
- On MacOS, you can run
open .to open the current directory in Finder. - On Windows, you can run
explorer .to open the current directory in File Explorer.
Pin this folder to your favorites for easy access later on!
- On MacOS, you can run
Automation - for fun
Let’s say you are a bookkeeper and you have a folder with all your receipts. You want to organize them by month. You could do this manually by creating folders for each month and moving the files one by one, but that would be time-consuming. Instead, you can use your terminal to quickly create 12 folders.
-
Create a new folder called “Receipts” in your Development folder by running
1

mkdir Receipts
Then navigate to the Receipts folder by running
1

cd Receipts -
Now, let’s create folders for each month using a single command. Run the following command in your PowerShell:
1

 1..12 | ForEach-Object { mkdir "Month_$_" }
or in your Bash terminal:
1

mkdir Month_{1..12}
This command uses a feature called “brace expansion” to create 12 folders named “Month_1”, “Month_2”, …, “Month_12”. You can verify that the folders were created by running
lsagain. -
Try removing one of the folders you created:
1
2

rm -r Month_9 -Force
ls
-
Now let’s create a file in one of the folders:
1

echo "Receipt from January" > Month_1/receipt.txt
and check what you just created from your file explorer
-
Let’s go up again one level and save the contents of a folder to a text file:
1
2

 cd ..
 ls > folder_contents.txt
Congratulations! You’ve now used the terminal to navigate, create folders, delete them, and create files. These are the fundamental skills you’ll use throughout your development work.
If time allows (remove .exe on macOS or Linux):
curl.exe wttr.in/Seoulcurl.exe ifconfig.mecurl.exe parrot.live
Install the toolkit for this semester
Below you find instructions to run a all-in-one script that will set up your system with the necessary tools for this course. The script will install (if not already installed):
- A package manager (Homebrew or Winget) to easily install and manage software on your system via the terminal
- Git for version control and collaboration
- Visual Studio Code as your code editor
- UV Python manager to manage your Python environments and dependencies
It will then create a new project folder (my-first-project-2026) in your Development folder, set up a virtual environment, and open your new project in Visual Studio Code.
If you prefer to install these tools manually, you can follow the instructions in the Get your systems ready from previous semester.
For Windows Users
- Copy and paste the code of this script into a text editor (like Notepad)
- Change the Git user name and email to your own
- Select all the code and copy it to your clipboard
- Open PowerShell, paste the code and press Enter
- Whenever the script prompts you for input (like during the Homebrew installation), follow the instructions on the screen
During installation you might be prompted to allow the script to run. If you see a message like “Do you want to run this script?”, type
Yand press Enter to allow it to continue.
For MacOS Users
- Copy and paste the code of this script into a text editor (like TextEdit)
- Change the Git user name and email to your own
- Select all the code and copy it
- Open your terminal, paste the code and press Enter
- Whenever the script prompts you for input (like during the Homebrew installation), follow the instructions on the screen
If the terminal asks for your password during the Homebrew installation, it’s asking for your Mac’s user account password. This is the same password you use to log into your Mac. It won’t show any characters as you type, but that’s normal. Just type your password and press Enter.
Visual Studio Code
Let’s explore the main components of the ma interface of Visual Studio Code together:
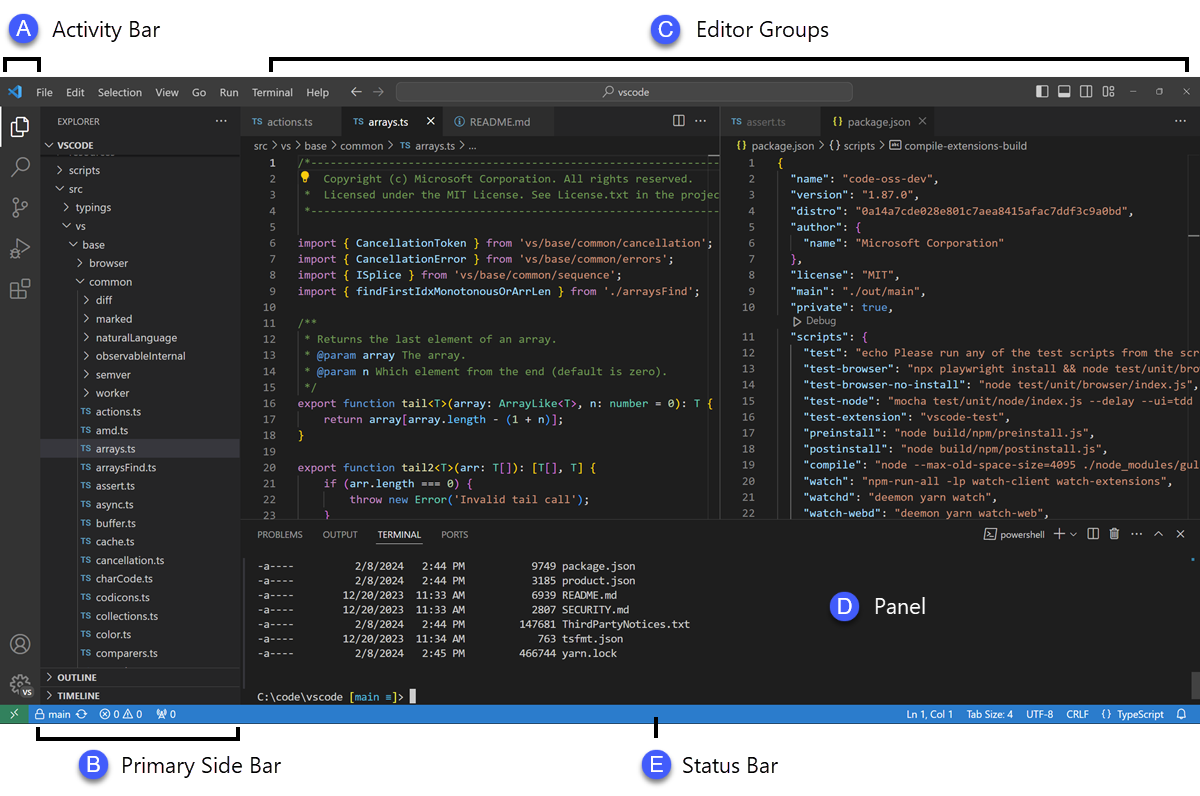
- Editor - The main area to edit your files. You can open as many editors as you like side by side vertically and horizontally
- Primary Side Bar - Contains different views like the Explorer, Source Control and Search to assist you while working on your project
- Secondary Side Bar - Opposite the Primary Side Bar. By default, contains the Chat view. Drag and drop views from the Primary Side Bar to the Secondary Side Bar to move them
- Status Bar - Information about the opened project and the files you edit. It also contains buttons to quickly access important features, like the branch selector when Git is enabled and the status of GitHub Copilot
- Activity Bar - Located on the far left-hand side. Lets you switch between views and gives you additional context-specific indicators, like the number of outgoing changes when Git is enabled. You can change the position of the Activity Bar
- Panel - An additional space for views below the editor region. By default, it contains output, debug information, errors and warnings, and an integrated terminal. The Panel can also be moved to the left or right for more vertical space
Floating windows
You can also open editors and views in separate floating windows, which can be useful when working with multiple monitors or when you want to focus on a specific task. You can make a floating window by dragging an editor or view out of the main Visual Studio Code window.
You can even pin a floating window to your desktop, so it stays on top of other windows. This can be useful for keeping important information visible while you work on other tasks. To pin a floating window to the top of the screen, select the Set Always on Top option (pin icon) from its title bar.
Built-in AI features (Github Copilot)
- Inline suggestions (code completion, code generation from comments, etc.)
- Ask (“How does authentication work in this project?”)
- Inline chat (Refactoring a function, adding error handling, etc.)
- Agents (Implementing a feature end-to-end, debugging an issue, etc.)
- Plan (Designing an architecture or migration strategy)
- Smart actions (Generating commit messages, fixing errors, renaming symbols, etc.)
Homework (due before Mar 24th)
As discussed, there will be no class on Thursday, March 19th. Instead, please complete the following tasks before Tuesday, March 24th:
- Introduction to GitHub
- GitHub skills: Communicate using Markdown (Lets have a look at the first steps together)
Be aware that we might view your GitHub profile to see how you have completed the above tasks during next class!
References
Git and GitHub
Markdown
UV
Visual Studio Code and CoPilot